Interface LCD 16x2 with Arduino
Introduction
16×2 LCD display (also called LCD 2×16) is one of the most popular and affordable ways to display messages, sensor readings, or status updates on a screen
This display shows 2 rows of 16 characters each, it is perfect for printing text, numbers, or simple menus. Whether you want to show a temperature reading, a countdown timer, or just a friendly “Hello, World!” message.
In this tutorial, you’ll learn everything you need to know to connect a 16×2 LCD to your Arduino and make it display custom messages.
Components Needed
Component
Quantity
Arduino Uno (or Nano/Mega)
1
LCD 16×2 Display
1
10kΩ Potentiometer
1
220Ω Resistor
3
Breadboard
1
Jumper wires (male-to-male)
16
USB cable (to connect Arduino to PC)
1
LCD 16x2 Pinout
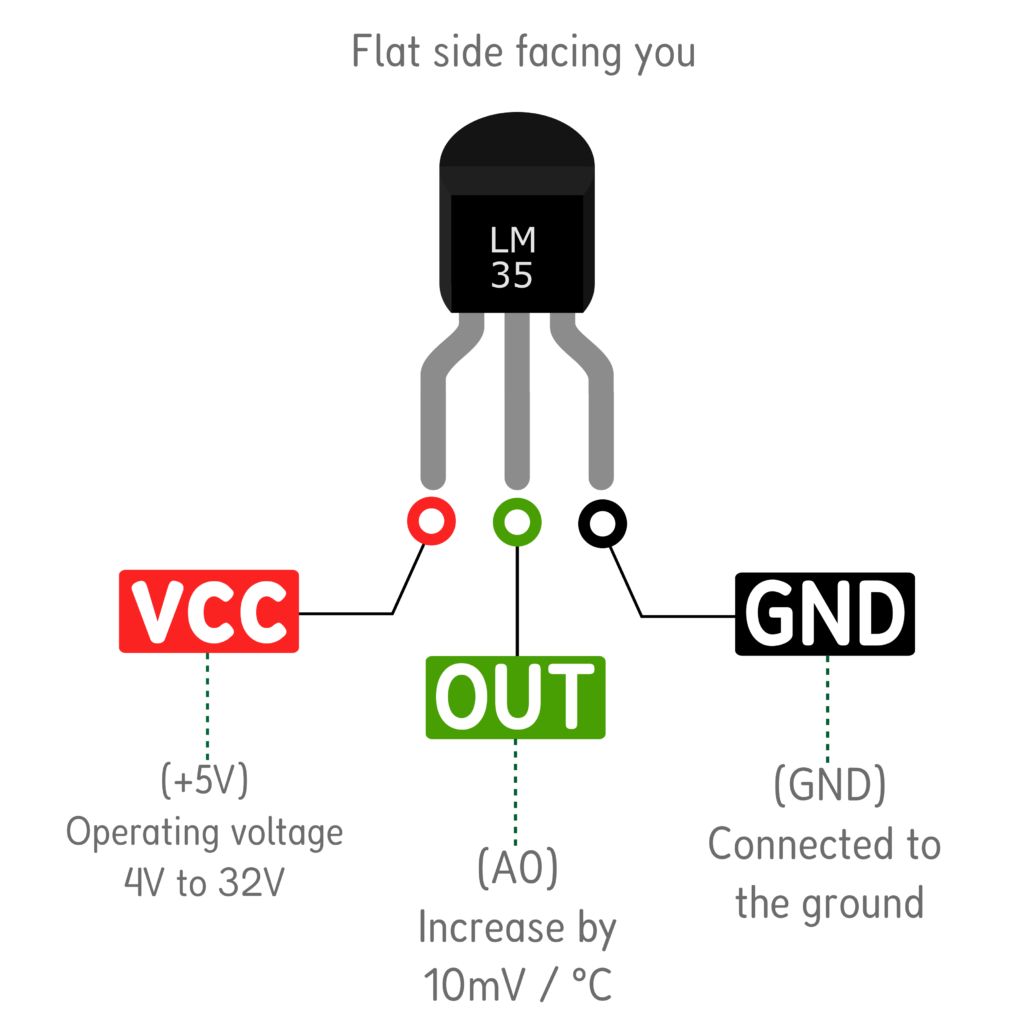
Name
Description
VCC
Power supply — connect to Arduino’s 5V pin
OUT
Analog voltage output — connect to Arduino’s A0 pin
GND
Ground — connect to Arduino’s GND pin
How the LM35 works
The LM35 outputs 10 millivolts (mV) for every 1°C of temperature. So at 25°C, the output voltage is 250mV (0.25V). At 100°C, it outputs 1000mV (1.0V).
The Arduino reads this voltage through its analog pin (0–5V range mapped to 0–1023), and you convert it back to Celsius with a simple formula.
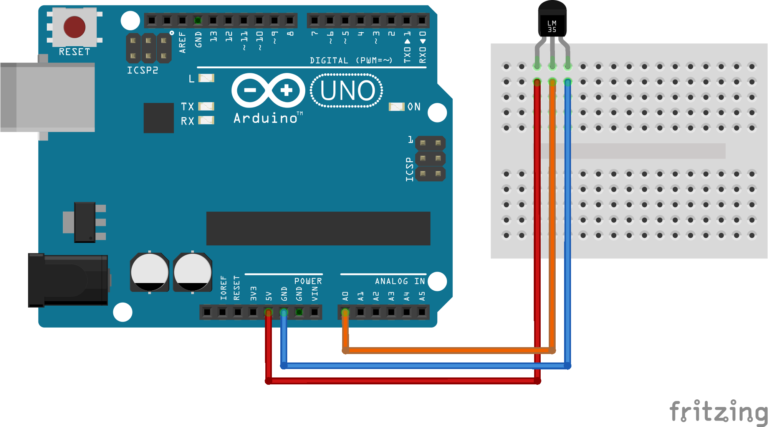
Circuit Diagram and Connections
The wiring for this project is very straightforward :
1. Place the LM35 on your breadboard with the flat side facing you.
2. Connect the left pin (VCC) to the Arduino’s 5V pin using a red jumper wire.
3. Connect the middle pin (OUTPUT) to the Arduino’s A0 (Analog pin 0) using a yellow or orange wire.
4. Connect the right pin (GND) to the Arduino’s GND pin using a black or bleu wire.
5. Connect your Arduino to the computer via USB.
Warning : If you connect VCC and GND backwards, the LM35 will get hot instantly. If you feel heat coming from the sensor after connecting, disconnect immediately!
Arduino Code
/*
 * LM35 Temperature Sensor with Arduino
 *
 * Description:
 *   Reads the analog voltage from the LM35 temperature sensor
 *   and converts it to temperature in Celsius and Fahrenheit.
 *   Results are printed to the Serial Monitor.
 *
 * Wiring:
 *   LM35 VCC  --> Arduino 5V
 *   LM35 OUT  --> Arduino A0
 *   LM35 GND  --> Arduino GND
 */

// Define the analog pin connected to the LM35 output
const int sensorPin = A0;

// Variable to store the raw analog reading (0–1023)
int rawValue = 0;

// Variables to store calculated temperature
float voltage = 0.0;
float temperatureC = 0.0;
float temperatureF = 0.0;

void setup() {
  // Start Serial communication at 9600 baud rate
  // This lets us print messages to the Serial Monitor
  Serial.begin(9600);

  // Print a welcome message once when the Arduino starts
  Serial.println("LM35 Temperature Sensor");
  Serial.println("========================");
  Serial.println("Starting readings...");
  Serial.println();
}

void loop() {
  // Step 1: Read the raw analog value from pin A0
  // analogRead() returns a value between 0 and 1023
  rawValue = analogRead(sensorPin);

  // Step 2: Convert raw ADC value to voltage
  // Arduino's ADC uses a 5V reference, divided into 1024 steps
  // Formula: voltage = (rawValue / 1023.0) * 5000  (result in millivolts)
  voltage = (rawValue / 1023.0) * 5000;

  // Step 3: Convert voltage to Celsius
  // LM35 outputs 10mV per degree Celsius
  // Formula: temperatureC = voltage / 10
  temperatureC = voltage / 10;

  // Step 4: Convert Celsius to Fahrenheit (optional)
  // Standard formula: F = (C × 9/5) + 32
  temperatureF = (temperatureC * 9.0 / 5.0) + 32.0;

  // Step 5: Print the results to the Serial Monitor
  Serial.print("Raw ADC Value : ");
  Serial.println(rawValue);

  Serial.print("Voltage       : ");
  Serial.print(voltage);
  Serial.println(" mV");

  Serial.print("Temperature   : ");
  Serial.print(temperatureC);
  Serial.print(" °C  |  ");
  Serial.print(temperatureF);
  Serial.println(" °F");

  Serial.println("------------------------");

  // Wait 1 second before taking the next reading
  // 1000 milliseconds = 1 second
  delay(1000);
}
Code explanation
const int sensorPin = A0;This line defines which analog pin the LM35’s output is connected to. Using ‘const int’ means the value won’t change accidentally during the program.
Serial.begin(9600);This line starts the Serial communication between the Arduino and your computer at 9600 baud (bits per second).
Note : Without this line, nothing will appear in the Serial Monitor. Make sure your Serial Monitor is also set to 9600 baud.
rawValue = analogRead(sensorPin);‘ analogRead() ‘ reads the voltage on pin A0 and converts it to a number between 0 (0V) and 1023 (5V). This is done by the Arduino’s built-in Analog-to-Digital Converter (ADC).
voltage = (rawValue / 1023.0) * 5000;We divide by ‘1023.0’ (not ‘1023’) to force floating-point division. Multiplying by 5000 gives us the voltage in millivolts (mV).
temperatureC = voltage / 10;The LM35 produces 10mV per °C, so dividing the voltage in mV by 10 gives us degrees Celsius directly.
temperatureF = (temperatureC * 9.0 / 5.0) + 32.0;This is the standard Celsius-to-Fahrenheit conversion formula. The ‘.0’ forces the calculation to use floating point for accurate results.
delay(1000);‘delay(1000)’ pauses the program for 1000 milliseconds (1 second) before looping again. This prevents the Serial Monitor from flooding with data too fast.
The Output / Results
After uploading the code and opening the Serial Monitor (Tools → Serial Monitor, or press `Ctrl+Shift+M`), make sure the baud rate is set to 9600. You should see output like this:
LM35 Temperature Sensor
========================
Starting readings...

Raw ADC Value : 153
Voltage       : 747.80 mV
Temperature   : 24.78 °C  |  76.60 °F
------------------------
Raw ADC Value : 154
Voltage       : 752.69 mV
Temperature   : 25.09 °C  |  77.17 °F
------------------------
Normal room temperature is roughly 20–30°C (68–86°F). If your readings are in that range, your circuit is working perfectly!
The raw ADC value will be around 140 – 200 at typical room temperatures (20–30°C). The temperature reading should update every second.
Tip : Touch the sensor gently with your finger. The temperature should rise by a few degrees within a few seconds. Then release it and the reading should slowly come back down. If this happens, your LM35 is working correctly.
Resources
feel free to ask any questions in the comments.